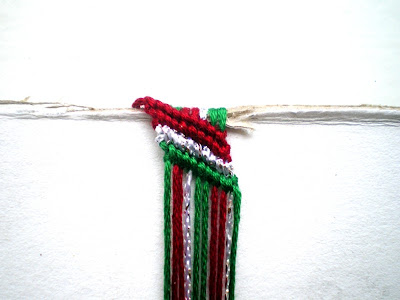
So if you have some time today, after having the yummy Turkey dinner, make yourself cozy and start making some awesome Friendship Bracelets to give to your friends this Christmas. Just follow this step by step tutorial provided by Isobel from SeriMarea. She describes it just so easy and she has some other wonderful bracelets in her shop. So if you don't have the time to make them yourself head over to her shop and grab some before it's too late!
Ok, here is her amazing tutorial, have fun!
1.
To make this Christmas
friendship bracelet, you’ll need embroidery thread in dark red, dark green and
metallic silver. Cut four strands of read, four strands of green, and two
strands of silver. Each strand should be roughly 25 to 30 inches long (63 to 76
cm).
2.
Lay out your threads in this
order: red, red, silver, green, green, red, red, silver, green, green. Now
secure them. You can knot all the threads together and pin them to a secure
surface, you can use a bulldog clip to hold them firm, or you can do what I did
here- duct tape the ends of the threads flat behind a piece of cardboard.
3.
Now we will make the first
knot. The thread on the far left
will be wrapping around the thread next to it (the inactive thread), and moving
over to the right. Start by taking the far left thread, and bringing it over the second thread.
4.
Now that you’ve brought the
thread over, bring it back under the
inactive thread, and up through the
loop that you’ve just created.
5.
Pull the until it tightens into
a knot, making sure that you keep the inactive thread pulled taut and straight.
Don’t make the knot too tight, just
make sure it’s secure. You’re halfway through the first knot!
7.
Then bring it back under the inactive thread. Remember to
keep the inactive thread nice and taut!
11.
Using the same red thread that
you just made a knot with, make a second knot around the silver thread. Follow
exactly the same steps, and remember that you need both halves of the knot in order for it to work.
12.
Bring the next thread in. This
one will be green. Using the same red thread, make a third knot. If your knots
are making a straight line, which they probably will, use your fingertip just
to nudge them up and down until you have a diagonal line.
13.
Use exactly the same knotting
method to knot around the next green thread. Remember to make sure that your
knots are all doubled- wrapping the thread around only once won’t work!
14.
Continue using the same thread
to knot all the way across the row, until all the threads are incorporated.
Neaten it into a straight diagonal line.
15.
Now start on the second row.
Take the thread from the far left, and knot it around the silver thread beside
it, using exactly the same knotting
method as on the first row.
16.
Keep working across the row in
the same way as the one before, knotting the red thread around each inactive
thread. You will probably find that your knots go horizontal again- just keep
nudging them into a diagonal line!
18.
Repeat with the next row,
starting with the thread on the far left, which will be silver. Again, remember
both halves of the knot, and keep
pushing your knots back into a nice neat line.
19.
Now move onto the next row,
which will be green. Knot your way across all the threads from left to right.
Hopefully by now your knots will automatically form a diagonal line, but you
may still want to neaten them a little.
22.
All you have to do is keep
following this pattern until eventually your bracelet is long enough!
23.
Now braid off the ends to
secure the bracelet. Use the braids to tie it onto your wrist, and your
Christmas friendship bracelet is all finished and ready to wear!
Thank you so much Isobel for sharing this wonderful instructions! I'm sure a lot of the readers will enjoy making some bracelets for themselves or for gifts in this Holiday season. I'm for sure going to try making one myself!
A little about Isobel in her own words:
"Based in Dublin, Ireland, I'm a 20yr-old student with a huge love of jewellery! I've been making friendship bracelets and other pretty things for years, but it's only recently that I decided to sell them- and so I started Seri Marea Jewellery! The main focus is friendship bracelets, especially personalised bracelets- I love making something that's completely unique, and exactly what the customer wanted! I also love embellishing and decorating friendship bracelets to make something that has all the appeal of a simple knotted thread bracelet, but also has a little extra edge! I add charms, rhinestones, studs, pieces of mirror, vintage jewellery findings, and (my personal favourite), tiny seed beads to bracelets. Ultimately, what Seri Marea Jewellery is about is beautiful, creative pieces, carefully and lovingly made!"
For the ones who don't have enough time to make them here are a few pictures from the personalized bracelets you can get from her shop:
See you next week and I hope you enjoyed this wonderful DIY Christmas Tutorial!
Sandra.
**Please note that this tutorial and all pictures provided are property of Isobel from SeriMarea and should not be copied or used without her permission. **


Much thanks to you for giving such significant data, and a debt of gratitude is for sharing this Business Promotion system.
ReplyDelete